Overview
The Symplicity integration allows uConnect to automatically import your jobs and events from Symplicity and display them throughout your platform — tagged to the right community pages and spaces — without any manual re-entry.
Video Walkthrough
Note: This is a read-only integration. uConnect pulls data from Symplicity but does not write any changes back.
Once the integration is active, uConnect can import:
- Events (calendar events, career fairs, workshops, info sessions)
- Jobs (standard postings, OCR/on-campus recruiting schedules)
- Employer data (to properly associate jobs and events)
What the Integration Looks Like for Students & Alumni
Events and jobs imported from Symplicity display on your uConnect platform just like native content. Here's what your users will experience:
Events
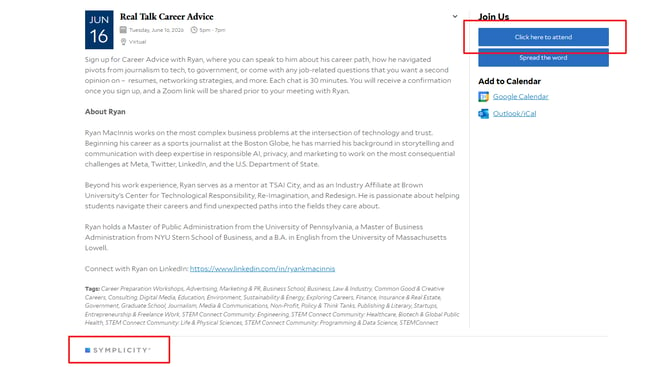
Events imported from Symplicity display with full details including the event title, date, time, location, description, relevant tags, and the Symplicity logo. Anyone can view event information publicly, but to RSVP or register, users click Attend — which redirects them to Symplicity to log in via single sign-on (SSO).
Jobs
Jobs work the same way. Job postings are publicly viewable on uConnect — whether featured on career community pages, industry-based pages, or in an all-opportunities view — but applying requires clicking the Apply Now button, which redirects the student to Symplicity to log in.

Tip: This setup keeps your content accessible to all visitors while preserving the exclusivity of applying or RSVPing for current students and alumni.
Before You Begin
Before starting, make sure you have access to someone at your institution who can contact Symplicity Support or your Symplicity account representative. They will need to enable API access for uConnect on your behalf.
Note: If you don't have a direct Symplicity contact, reach out to their support team via the Symplicity support form before beginning these steps.
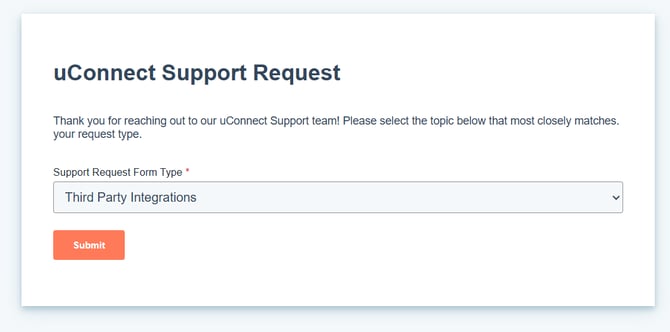
Step 1: Submit a Support Ticket to uConnect
The integration setup process begins with a support ticket to the uConnect team. You can submit a ticket two ways:
- Visit support.gouconnect.com and use the Submit a Ticket option
- Click Submit a Ticket directly from your Admin Dashboard
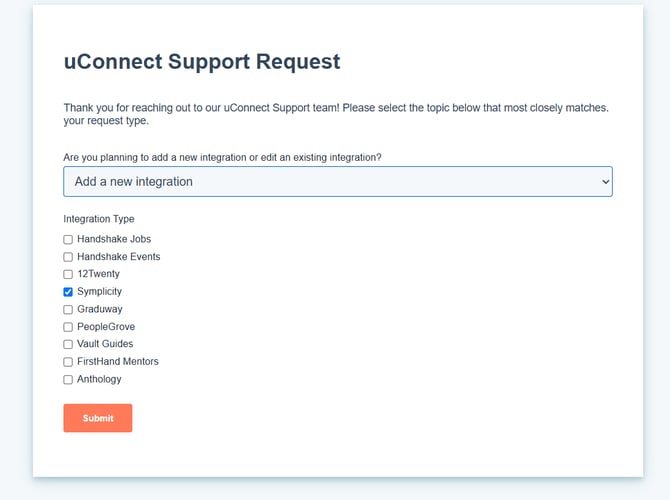
When prompted, select Third-Party Integrations as your topic, then choose Symplicity as the integration you want to set up.
In the form, you'll be asked to provide:
- Your email address
- Your Symplicity CSM URL (format: https://[SCHOOL_ID]-csm.symplicity.com/)
- Whether you want to import Curated Jobs or not (more on this in Step 3)
Once submitted, the uConnect support team will follow up within 24–48 hours to walk you through next steps.
Step 2: Request Symplicity API Access
While waiting to hear from the uConnect team, you'll need to contact Symplicity to enable API access for the integration. Send an email to Symplicity Support with the following details.
Information to Provide to Symplicity
|
Field |
Value |
|
API Username |
uconnect |
|
|
webmaster@gouconnect.com |
|
Account Type |
Standard Use / Long-Term |
|
API Expiration |
1 year from activation |
Required Read Permissions
Ask Symplicity to grant Read access for each of the following:
- Calendar Event
- Career Fair
- Workshops
- Info Sessions
- Employer
- Job
- OCR Schedule Data
Important: All permissions listed above are required. Missing permissions can result in incomplete data or a failed integration sync.
Email Template — Copy & Paste
|
Hello Symplicity Support, We are setting up the uConnect integration and need API access enabled for uConnect. Please create or enable an API account with the following details: - Username for the API: uconnect - Email: webmaster@gouconnect.com - Account type: Standard Use/Long-Term Permissions requested (Read): - Calendar Event - Career Fair - Workshops - Info Sessions - Employer - Job - OCR Schedule Data Please set the API account expiration date to 1 year. Thank you! |
Step 3: Decide Your Import Settings
When submitting your support ticket (Step 1), you'll also be asked to confirm a few configuration preferences.
Curated Jobs
Some Symplicity environments include curated or aggregated job listings. Let the uConnect team know if you want to skip importing these.
- Skip Curated Jobs: Check yes if you only want standard postings, or want to reduce job listing volume
- Include Curated Jobs: Check no if you want all available jobs from Symplicity to appear in uConnect
Not Sure? If you're unsure whether you use curated jobs in Symplicity, check with your Symplicity admin or account rep before submitting.
Step 4: What uConnect Configures on the Back End
Once your support ticket is received, the uConnect support team handles the technical configuration on your behalf. Here's a look at what happens behind the scenes — it's helpful context so you know what to expect!
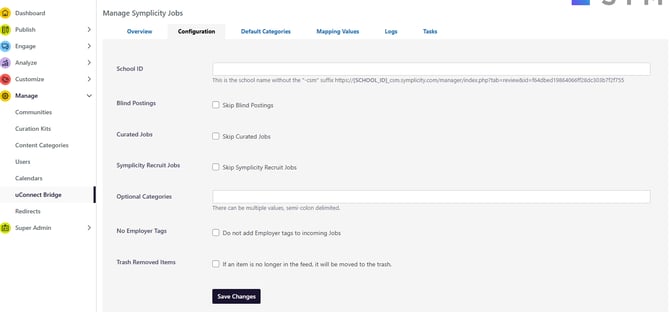
The uConnect Bridge
uConnect uses a back-end tool called the uConnect Bridge (under Manage in your Admin Dashboard) to manage all integration settings. You'll see a limited view of this area, but the full configuration is handled by the support team.
For the Symplicity integration, the team will configure:
- Your school ID
- Whether to skip blind postings, curated jobs, or Symplicity Recruit jobs
- Auto-trash for removed items (so jobs that are no longer in Symplicity's sync feed are automatically moved to Trash)
- Any custom categories unique to your institution

Mapping Values
The support team will also set up mapping values — this is where data coming in from Symplicity (like job types, majors, or industries) gets matched to the equivalent tags and communities in uConnect.
To make this process collaborative, the support team will share a Symplicity Mapping Sheet (a Google Sheet) that mirrors the bridge configuration. Here is an example of what the support team can create for you. You'll use this to review and provide input on:
- Job or Event types (workshops, career fairs, internships, full-time, etc.) → uConnect content categories
- Majors or academic designations → career communities
- Job functions, degree levels, class levels, work authorization
For each incoming tag from Symplicity, you'll indicate:
- Should this tag be imported?
- What should it map to in uConnect?
- Should it auto-publish? (Recommended — see below)
Recommended: Enable Auto-Publishing - Auto-publishing means that every time Symplicity syncs with uConnect, imported content is automatically tagged and published — no manual review needed. This is the most popular option because it's truly set-it-and-forget-it. Do the work once up front, and your integration runs itself.
You can also map multiple Symplicity values to a single uConnect tag. For example, if you want both "Advertising" and "Digital Design" majors to be associated with the same career community, just indicate that in the mapping sheet.
Once you've completed the mapping sheet, let the support team know in the ticket. They'll configure the values in the Bridge, run an initial sync, and notify you when content is live.
Step 5: View & Manage Imported Content
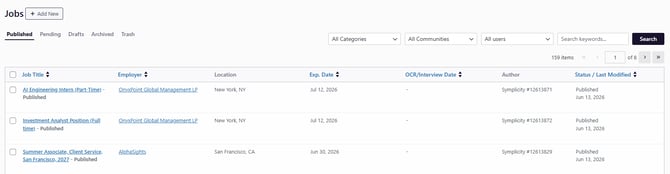
After the sync runs, you can view all incoming Symplicity content in your Admin Dashboard under Publish.
How to Tell What's Coming from Symplicity
In the Events or Jobs publish view, check the Author column under Publish>Jobs or Publish>Events. Any content imported from Symplicity will show Symplicity as the author.
![]()
Editing and Managing Imported Content
Even with auto-publishing enabled, you always have control over individual items:
- Edit: Hover over any event or job and click Edit to make changes
- Trash: Hover and click Trash to remove an item from the public-facing platform. It moves to the Trash tab — it is not permanently deleted.
- Restore: Items in Trash can be restored at any time. Permanent deletion only happens manually from the Trash tab (or automatically after a set period).

Trashing Items: Trashing an item only removes it from the front end of your platform — it doesn't affect Symplicity. If the item is still in the sync feed, it may reappear on the next sync unless permanently deleted.
Sync Frequency
Your Symplicity integration syncs automatically every 24 hours. If you need content to appear sooner, contact the uConnect support team and request a manual sync — they can force one for you right away.
Known Limitations
Workshops with Filtering Cannot Be Imported
Workshops that use filters in Symplicity (such as class-level restrictions) cannot be imported due to a Symplicity API limitation.
Workarounds:
- Remove filtering from the workshop in Symplicity (if appropriate for your institution)
- Manually create an equivalent event in uConnect without filters
Troubleshooting
Some Data Is Missing
This is usually caused by missing API permissions. Confirm with Symplicity that Read access was granted for all required endpoints: Calendar Event, Career Fair, Workshops, Info Sessions, Employer, Job, and OCR Schedule Data.
The Integration Stopped Working
Check whether the Symplicity API account has expired. The API account should be set to renew annually — if it has lapsed, contact Symplicity to renew it.
Events Appear on the Wrong Calendar
This typically means the wrong calendar was selected during setup. Contact uConnect Support to resubmit your configuration with the correct calendar selected.
Quick Setup Checklist
Use this checklist to track your progress through the integration setup:
- Submit a support ticket to uConnect (Third-Party Integrations > Symplicity)
- Contact Symplicity to request API access with the correct username, email, and account type
- Confirm all required Read permissions are granted in Symplicity
- Verify the Symplicity API account expiration is set to 1 year
- Provide your Symplicity CSM URL to uConnect
- Decide whether to skip Curated Jobs
- Complete the Symplicity Mapping Sheet shared by the uConnect team
- Notify the support team when your mapping sheet is complete
- Confirm sync is live and spot-check imported events and jobs
Still have questions?
Reach out to the uConnect support team via a support ticket or our chat bot anytime at support.uconnect.com. We're excited to get your Symplicity content flowing into your platform and in front of your students and stakeholders! 🎉