
Export your subscriber list to analyze subscriber data and preferences, then use it to update, retag, unsubscribe, or remove subscribers in bulk.
Over time, your subscriber list naturally changes. Students graduate, alumni move on, and communities evolve. Exporting your subscriber list gives you a full picture of your subscribers in a format that works for you. You can review subscriber types, email preferences, community tags, and more.
Your exported list is also the starting point for list cleanup. After you filter the list down to the subscribers you want to change, you can re-upload it through the manual subscriber upload area and take action on that group all at once.
Export your subscriber list
- Log in to your uConnect Admin Dashboard.
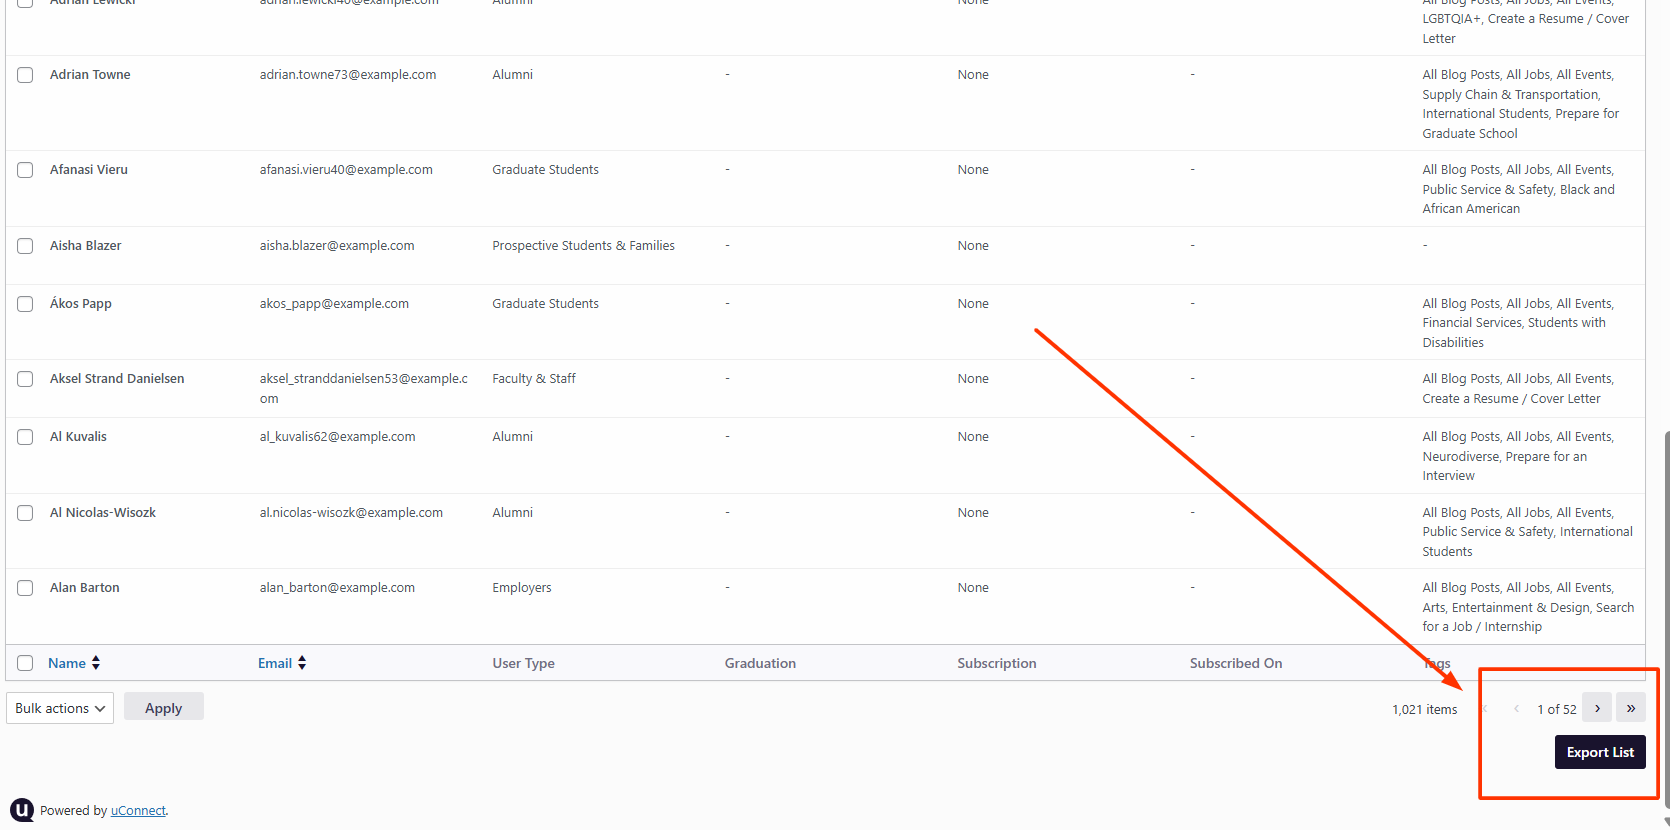
- Go to Engagement > Subscribers. You'll see a summary of your subscribers, including subscriber types and totals.
- Scroll to the very bottom of the page. Click the Export List button in the bottom-left corner.
- A notification will appear letting you know your export has started.
- Check your inbox. A CSV file will be sent to the email address you use to log in to uConnect, which is typically your institutional email.
Filter your list in Excel or Google Sheets
When your CSV arrives, open it in Excel or Google Sheets. The file includes subscriber types, community tags, email preferences, and other subscriber details.
- Add filters to the column headers.
- Filter by the column that matches your goal. For example:
- To find all alumni, filter the user type column to show only alumni.
- To find everyone in a specific career community, filter that career community column.
- Copy the filtered rows into a new tab or file. Give it a clear name, such as "Alumni subscribers."
- Save that tab as its own CSV or Excel file. This is the file you'll upload for your cleanup task.
💡 Tip: Keep your original export as a backup before making changes. That way, you always have a record of your list before cleanup.
Clean up subscribers with the manual subscriber upload
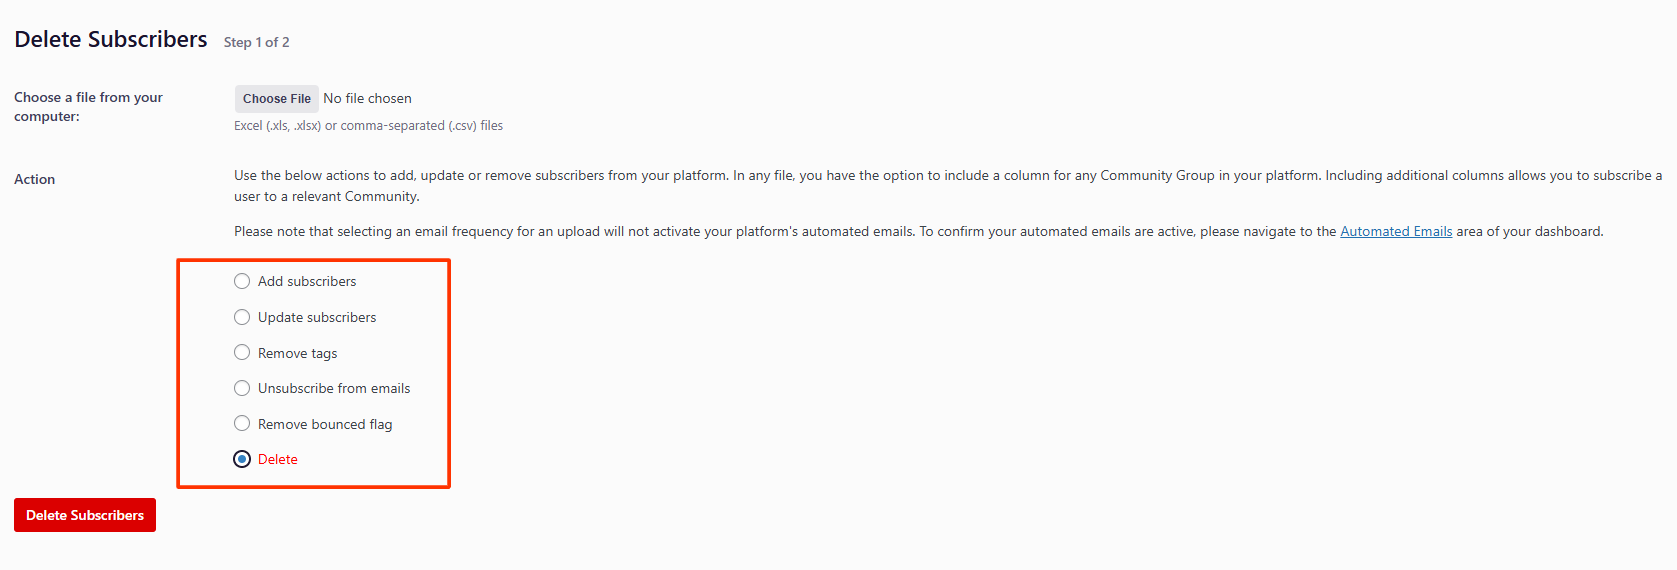
The manual subscriber upload area offers several ways to take action on subscribers. Because an exported list contains subscribers who are already in your platform, you'll typically use the options below instead of Add Subscribers.
Update subscribers
Use this option to change information for a group of existing subscribers. For example, you can:
- Change subscribers from one user type or group to another.
- Opt subscribers into a different email frequency, or set them to inactive.
Remove tags
Use this option to remove community tags from a group of subscribers. For example, say you previously opted all first-year students into an exploratory career community and no longer want them tagged. You can upload a list of those students and remove that tag.
Unsubscribe
Use this option to unsubscribe a group of subscribers from your emails.
Heads up: If you're planning to unsubscribe everyone, you may want to adjust your email settings instead. You can find these under Engage > Email.
Remove bounce flags
When an email bounces, the subscriber's email address usually appears with a strikethrough on the Engagement > Subscribers page. Bounces often happen when a student has withdrawn or graduated and their email is no longer active. Use this option to clear bounce flags, or review these subscribers and remove them as needed.
Delete subscribers
Deleting is one of the most common cleanup tasks. Many career centers run regular deletion cycles, such as removing alumni after a set amount of time or removing user groups they no longer support.
Upload your cleaned-up list
- Go to the Manual Subscriber Upload area.
- Select the option that matches your goal: Update subscribers, Remove tags, Unsubscribe from emails, Remove bounced Flags, or Delete.
- Click Choose File and select the file you saved from your filtered list.
- Complete the column mapping steps that follow.
- Submit your upload, and you're all set!
Example: Deleting all alumni subscribers
- Export your subscriber list and open it in Excel or Google Sheets.
- Filter the user type column to show only alumni.
- Copy those rows into a new tab and save it as its own CSV or Excel file.
- In the manual subscriber upload area, select Delete, choose your file, and complete the mapping steps.
Example: Removing a career community tag
- Export your subscriber list and filter the career community column. For example, filter to everyone opted into Agriculture.
- Save those subscribers as their own file.
- In the manual subscriber upload area, select Remove Tags, choose your file, and complete the mapping steps.
Good to know
- Exported lists are sent to the email address you use to log in. If you don't see the email, check your spam or junk folder.
- Only admin users can export subscriber lists.
- Deleting subscribers cannot be undone. Double-check your file before uploading, and keep a copy of your original export.
- If you're unsubscribing all subscribers, consider changing your email settings under Engage > Emails instead.
Need more help?
Visit our support site or reach out to the uConnect support team. We're always happy to help!