Overview
Your VCC Community pages are spaces tailored to specific student audiences — by major, industry, interest, or program. With the ODV module, you can connect your outcomes data directly to these Communities, so students automatically see outcomes relevant to their own path.
A student visiting your Business community sees business outcomes. A student in your Health Sciences community sees health sciences outcomes. This targeted experience makes your outcomes data significantly more useful — and more likely to be engaged with — than a single, unfiltered outcomes page.
Why This Matters
Students are most motivated by information that feels personally relevant. Research consistently shows that career exploration increases when students can see concrete outcomes for people who share their major or interests. Connecting outcomes to Community pages closes that loop directly within the spaces where students are already spending time.
|
💡 Pro Tip Think of community-level outcomes as outcomes data with a personalized lens. The data is the same — the filter is just pre-set based on who is viewing it. This is one of the most compelling uses of the ODV module because it requires no extra effort from students to find relevant information. |
How Community-Level Outcomes Filtering Works
When submitting a widget ticket to add an Outcomes widget to a Community page, you can configure it to display outcomes pre-filtered by a specific major, division, or other data point. Visitors to that Community see a focused view of your outcomes data — not the full, unfiltered page.
This filtering is driven by the same data and filter settings you have configured in your main ODV setup. You do not need separate data files for each Community.
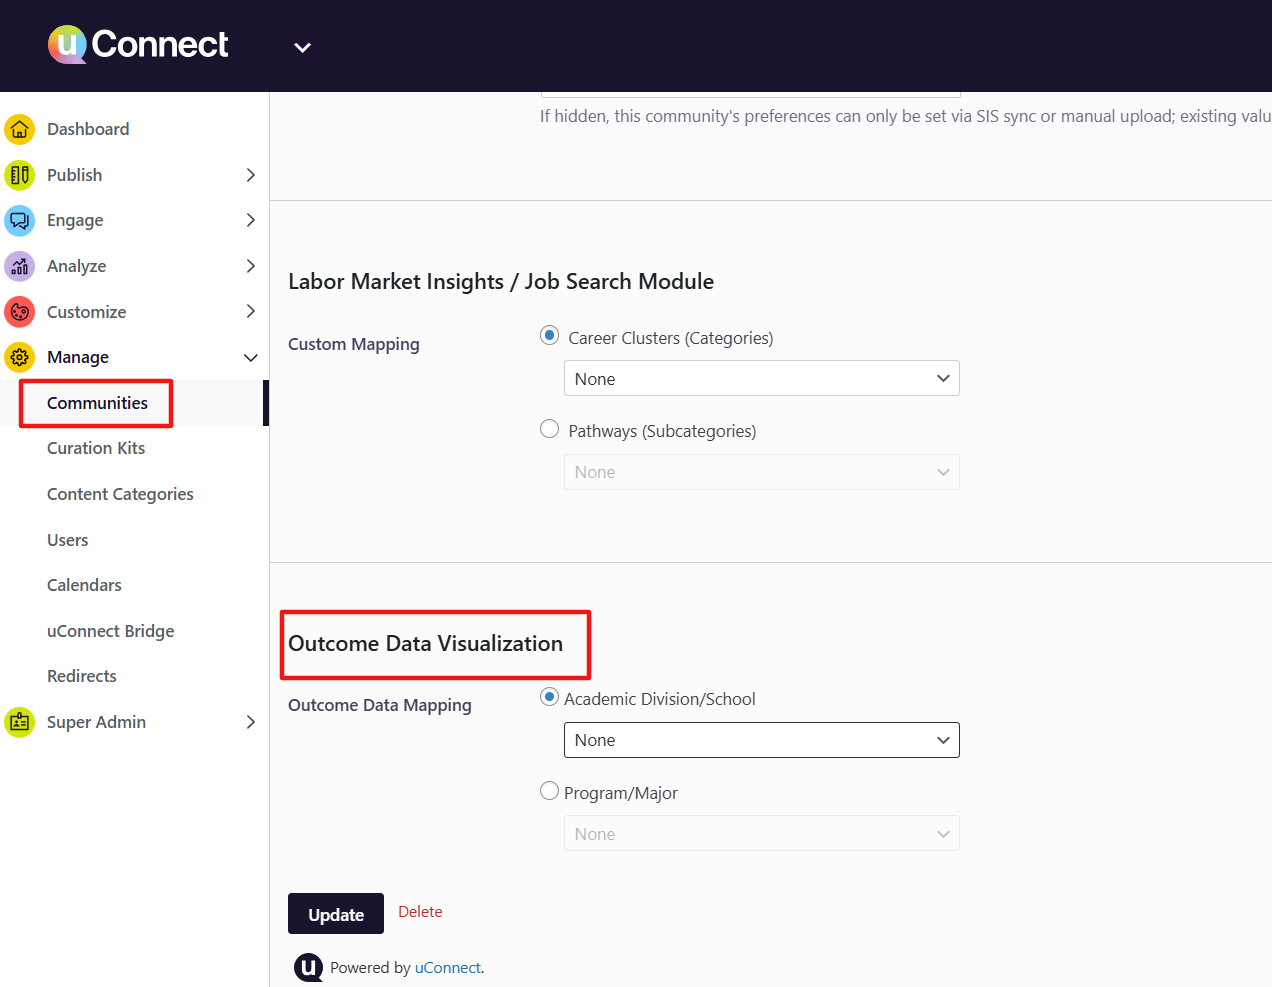
Adding an Outcomes Widget to a Community Page
- Navigate to the Community page you want to configure in your admin dashboard under Manage>Communities.
- Click “Edit” and once you’re on the Editing page, scroll down to the bottom of the Community editing page. You should see an “Outcomes Data Visualization” section.
- You will find two Outcomes Data Mapping options: 1) Academic Division/School, and 2) Program/Major.
- Configure the pre-set filter for that Community (e.g., filter to "Business Administration" Program/Major for a Business community).
- To save your changes, click the “Update” button and preview the page.
Recommended Use Cases
- Major-specific communities: Pre-filter to the corresponding major so students see outcomes for their exact program.
- Industry communities: Pre-filter to relevant industries or fields (e.g., pre-filter a Healthcare community to health-related outcomes).
- Graduate/undergraduate communities: If you have both data sets uploaded, filter to the appropriate degree level for each community.
- Class year communities: For alumni communities organized by graduation year, pre-filter to outcomes from that cohort.
Tips for Maximum Impact
- Add a brief introductory text block above the Outcomes widget to give context — for example, "See where [Major] graduates have gone after earning their degree."
- Pair the Outcomes widget with relevant job postings, employer profiles, or resources within the same Community for a more complete career exploration experience.
- Connect with faculty or department advisors to let them know the data is available in their program's Community — they can direct students to it during advising sessions.
|
💡 Pro Tip Community-level outcomes data is also a strong talking point when engaging employers. An employer recruiting history majors can see, right within the History community, that your graduates go on to careers in fields their organization cares about. |