
Automated Subscriber Uploads allow your institution to securely sync subscriber data — typically students — from your Student Information System (SIS) directly into uConnect. This integration powers two key capabilities within the platform:
- Email communications — Career center teams can email any students uploaded via SIS directly from the platform
- Engagement data tracking — Analyze which content students are engaging with the most and the least, and segment communications accordingly
While most institutions upload student data, you may also include alumni, faculty, and staff in your file. Manual uploads remain available at any time and are not impacted by enabling automation.
You can manage the entire SIS file setup process within the uConnect platform itself — giving you full control over your file's mapping, syncing, and ongoing settings.
📝 Note: This feature is predominantly used for student data uploads, but alumni, faculty, and staff can also be included in the file
Before You Get Started: Format Your SIS File
If this is your first time setting up a SIS file, review our formatting guidelines before beginning setup. Understanding the required and optional fields upfront will help your IT team build the file correctly from the start.
👉 How to Format a Subscriber List
You can also reference our SIS sample file template, which defines required and optional fields on the second tab:
👉 Download SIS Sample File Template
Overview of the Setup Process
Setting up automated uploads includes seven main steps:
- Confirm whether SIS is already enabled in your uConnect platform
- Coordinate with IT to prepare your SIS file
- Begin the automated upload process in uConnect
- IT uploads the file to your secure S3 bucket
- Complete field mapping and activate the ongoing sync
Step 1: Confirm Whether SIS Is Already Enabled
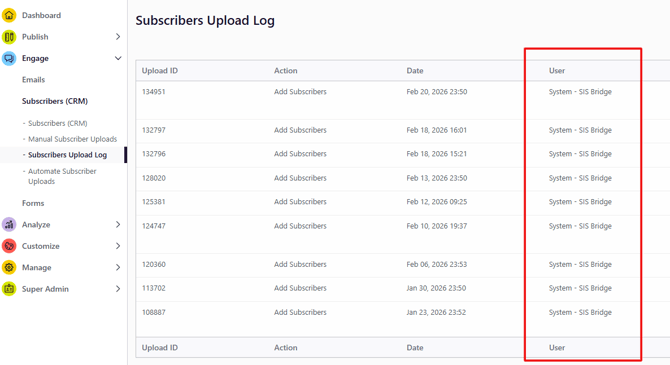
Navigate to: Engage > Subscribers > Subscriber Upload Log
Check the User column and follow the appropriate next step below:
- If you see "System-SIS Bridge" listed under the User column, automation is already active. If you need to make changes to your existing SIS file, coordinate with your IT team and submit a support ticket. The uConnect support team will assist you with any configuration changes.
- If "System-SIS Bridge" is not listed, continue reading and follow the remaining steps!
⚠️ Important: If you already have an active SIS integration with uConnect, our support team must help you make edits to the file configuration or sync settings on your behalf. For any new SIS integrations set up going forward, you can manage the full setup process within uConnect yourself.
Step 2: Coordinate With Your IT Team
Your IT department (or whichever team on campus can generate a student data file) must create a recurring SIS file in CSV format. They will need to:
- Review formatting requirements (share this article and the SIS Sample File Template)
- Determine which fields to include based on your student population
- Configure automated recurring uploads to overwrite the existing file with each new upload
- Combine multiple populations (undergrad, grad, alumni) into a single file if applicable
📝 Note: uConnect processes only one file. If uploading multiple user populations, include them all in a single CSV and use a field such as USER_TYPE or STAKEHOLDERS to distinguish them. A user may only appear once in the file — duplicate records (same email or ID) are not permitted.
Email Template to IT
Use the template below to initiate the conversation with your IT contact and get the process started.
Subject: Request for SIS Integration Setup for uConnect
Hi [IT Team / Name],
I hope you're doing well. My name is [Your Name], and I serve as the [Your Title] in the [Career Center / Department Name] at [University Name].
Our office uses uConnect, a content management system that powers our career center website and serves as our virtual career center platform. We use uConnect to share curated career content, manage targeted communications, and support student engagement across career communities.
To fully utilize the platform, we are looking to implement an automated Student Information System (SIS) integration. This will allow us to securely sync student data into uConnect so that we can:
- Email students directly from the platform
- Segment communications appropriately
- Track student engagement with career-related content
We are requesting your assistance with creating a recurring student subscriber file in CSV format that meets uConnect's formatting and field requirements. The file must include the required fields below:
- FIRST_NAME
- LAST_NAME
- USER_ID or USER_LOGIN (required if SSO is enabled or email is not a persistent identifier)
- GRADUATION (4-digit year format, e.g., 2026)
- STAKEHOLDERS / USERS ( e.g., Undergraduate, Graduate, Alumni — one value per user)
Additional optional fields (such as program or community-related data) can also be included if available.
Once the file has been created and is ready for automation, I will initiate the automated upload process within uConnect. At that time, you will receive secure instructions for uploading the file to a designated Amazon S3 bucket. The credentials will be time-sensitive, so we will coordinate timing accordingly.
After the initial file is successfully uploaded, our team will complete the final configuration steps within the uConnect dashboard to activate the ongoing automated sync.
Please let me know a good time to discuss next steps, or if you need any additional documentation regarding file formatting requirements. I'm happy to share the full technical specifications from uConnect.
Thank you in advance for your support!
Best, [Your Name] [Your Title] [Department Name] [University Name] [Contact Information]
Step 3: Begin the Automated Upload Process
Navigate to: Engage > Subscribers > Automate Subscriber Uploads
Click Begin Automatic Subscriber Uploads Process button.
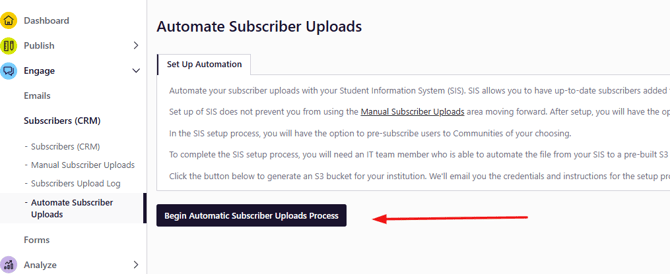
When you click this button:
- A secure Amazon S3 bucket is automatically created for your institution
- You receive an instructional email that you can forward directly to your IT team
- The email includes a secure link to generate S3 access credentials (valid for 7 days)
📝 Note: If the credential link expires before your IT team uses it, return to the Automate Subscriber Uploads page and select Resend Email to generate a new one.
📝 Caution: Automating uploads does not disable manual uploads — you can continue using manual uploads at any time.
What the Instructional Email Includes
The email sent to you (and forwarded to IT) contains:
- Setup instructions for your IT team
- A recommended CSV file template
- A secure link to generate S3 credentials
- Instructions for regenerating credentials if the link expires
Step 4: IT Uploads the File to the S3 Bucket
Your IT team will:
- Generate S3 credentials from the secure link provided in the instructional email
- Configure an automated, recurring process to upload your SIS CSV file to the assigned S3 bucket
- Ensure each new upload overwrites the previous file (only one file can be processed at a time)
SIS File Name Guidance
There are no specific file name requirements, but including your institution's name, "uConnect," and a time frame can be helpful for reference. For example:
"uConnect_[InstitutionName]_CurrentStudents_[Term][Year].csv"
The naming convention is entirely up to you — just keep it consistent for your IT team.
⚠️ Important: The file must include a header row and at least one data record. Empty files will not be processed. You cannot complete the setup in the uConnect dashboard until the first file has been successfully uploaded.
⚠️ Important: The file must include a header row and at least one data record. Empty files will not be processed. You cannot complete the setup in the uConnect dashboard until the first file has been successfully uploaded.
Step 5: Configure Automation Settings in uConnect
Once the first file has been uploaded, return to:
Engage > Subscribers > Automate Subscriber Uploads
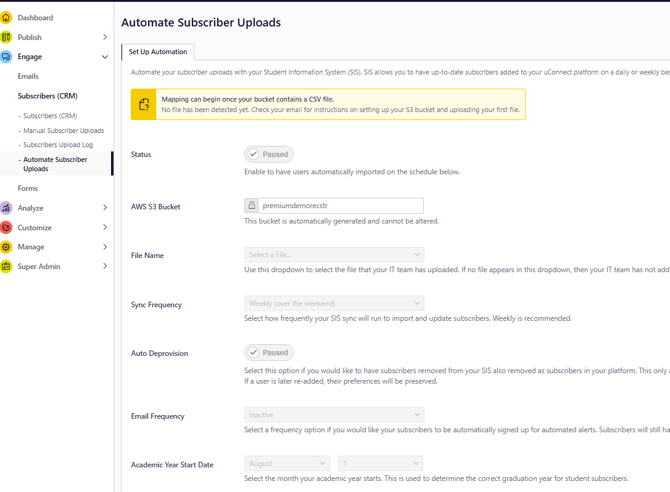
Configure the following settings:
Status
Toggle to Active to enable ongoing automated syncs.
AWS S3 Bucket
This is automatically generated when you begin the setup process and cannot be edited.
File Name
Select your SIS file from the dropdown. Typically, only one file will appear.
Sync Frequency
Choose how often uConnect imports your data:
- Weekly (recommended for most institutions — processes Saturday night)
- Daily
Auto Deprovision
If enabled, subscribers not present in the most recent SIS file will be automatically removed from your subscriber list. Use this setting carefully and confirm it aligns with your institution's data management practices.
Email Frequency
Optionally auto-enroll subscribers in a specific email cadence upon upload.
Academic Year Start Date
Select the month and day your academic year begins. This is used to determine the correct graduation year for student subscribers and will automatically advance class year designations (e.g., sophomore to junior) on the date you select.
Actions (Optional Tools)
These optional tools are available on the Automate Subscriber Uploads page:
|
Action |
Description |
|---|---|
|
Import Users |
Run an immediate, manual sync outside of the scheduled cadence |
|
Download List |
Download a report of all subscribers included in the current SIS file |
|
View Log |
View details of recent imports, including records added, skipped, or flagged |
Step 6: Format and Map Your SIS File
After selecting your file, you will map your CSV column headers to uConnect fields. Once all required mappings are complete and Status is set to Active, your automated SIS sync is live.
👉 Download SIS Sample File Template
CSV Formatting Requirements
Your file must:
- Be in CSV format
- Follow RFC 4180 standards:
- Comma-separated values, one row per line
- Fields containing commas must be enclosed in double quotes
- Multiple values within a single field must be separated by semicolons
- Contain a header row
- Include at least one data row (an empty file will not be processed)
- Overwrite the previous file with each upload
Example of properly formatted CSV:
student_id,first_name,last_name,email,major
12345,Alex,Morgan,alex.morgan@example.edu,Biology
67890,"Taylor, Jr.",Lee,taylor.lee@example.edu,Chemistry
Required Fields
Your SIS file must include the following column headers, mapped to the corresponding uConnect fields:
FIRST_NAME
The subscriber's first name, as recorded in your system of record. Some institutions use preferred name here.
LAST_NAME
The subscriber's last name, as recorded in your system of record.
The student's university email address. Must be valid and non-blank — records with invalid or missing email values will be skipped during import. Email may also serve as the SSO identifier if applicable.
USER_ID or USER_LOGIN (SSO ID)
Each subscriber must have a persistent unique identifier that does not change over time.
This field is required if:
- Email is not a persistent identifier, or
- The email does not match the SSO login attribute passed during login
If SSO is enabled:
- USER_ID or USER_LOGIN must match the SSO attribute used during authentication
- This prevents duplicate accounts from being created
- Email may serve as the unique identifier only if it is persistent and matches the email passed via SSO
This field also ensures that a subscriber's identity persists across role changes (e.g., from student to alumni).
GRADUATION
Required if your institution uses class year tags.
- Must be a 4-digit year (e.g., 2025) — no other date formats are supported
- Directly correlates to students' Class Year tags, which are automatically applied to subscribers
- Used to determine when a student's status converts to Alumni. For example, when a student's graduation date passes, their status will automatically switch to "Alumni" based on the Academic Year Start Date configured in your settings (defaulting to August 1st)
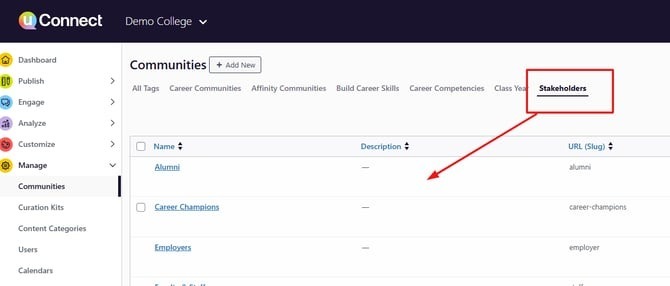
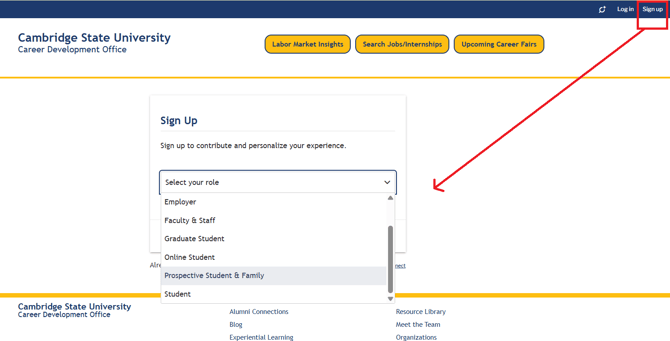
STAKEHOLDERS (User Type)
Identifies the subscriber's user type (e.g., Undergraduate, Graduate, Alumni).
- You can assign only one stakeholder value per user
- These values are directly tied to the Stakeholder Communities configured in your uConnect platform (also referred to as "Audience," "People," or "People We Serve")
- These are the same user types that new users select when creating an account in your uConnect platform
Optional Fields
EMAIL_OPT_OUT
Opts the user out of all email communications. Accepted values: 1, YES, TRUE (case-insensitive)
DELETE
Deletes an existing user record. Accepted values: 1, YES, TRUE
PROGRAM
The PROGRAM field is the primary field used to associate students with Career Communities based on their program of study. This can include a student's academic major, concentration, or program code — whatever your institution uses to classify students by area of study in your system of record.
Important notes about the PROGRAM field:
- Values are typically program codes pulled from your institution's student data system (e.g.,
ECON,BAC-CHEM-1,CS-GRAD) - These codes need to be mapped to the corresponding Career Communities in your uConnect platform — this does not happen automatically
- This field is configured during Step 6 (field mapping), after your SIS file has been uploaded to the S3 bucket
- Because program codes vary by institution, this field requires coordination with the uConnect support team to ensure your codes are correctly mapped to the right Communities before or during your initial setup
If you plan to include the PROGRAM field, reach out to our support team early in the process so they can prepare the correct mapping alongside your IT team.
Community Fields (e.g., AFFINITY, INDUSTRY, MAJORS, ACADEMIC_COLLEGE)
You may include additional columns to map users into Community Groups within uConnect.
📝 Important: You can only map data to existing Communities within your uConnect platform. If you are unsure whether the equivalent Communities exist, reach out to your career center contact or our support team before proceeding.
Community field rules:
- One extra column per Community Group
- One column maps to one Community Group
- Multiple values in a single cell must be separated by semicolons
- Multiple values can map to one community
- You cannot map combinations of values to a single community
- If column headers or values do not exactly match existing Community names in uConnect, you will need to manually map them during the upload process
Example:
|
INDUSTRY |
AFFINITY |
ACADEMIC_COLLEGE |
|---|---|---|
|
Manufacturing |
First Gen; Military |
College of Engineering |
Mapping to Majors Implication: Most of our uConnect customers will map their students' academic majors/programs to a corresponding/related uConnect career/industry community. Typically, we do not recommend that you map a students' academic majors/programs to a corresponding/related uConnect major community because to do this you would have to create a uConnect community for every single major at your institution, which could be hundreds of pages. Only in unique circumstances do we have uConnect customers who actively use and maintain academic-based uConnect communities so please consider using industry-based career communities instead for broader mapping.
Combining Multiple Populations
If your file includes multiple user types (e.g., Undergraduate, Graduate, Alumni):
- Combine all users into one single CSV file
- Include a field identifying the user type (e.g., STAKEHOLDERS or USER_TYPE)
- Each user may only appear once in the file — duplicate records are not permitted
Email Preference Behavior
If a subscriber has previously:
- Opted out of email communications, or
- Customized their email preferences
Those settings will remain unchanged during SIS sync.
Step 7: Sync, Monitor, and Optimize Your SIS Integration
Error Handling
If required fields are missing, unmapped, or incorrectly formatted, you will see warnings or error messages in the dashboard. You can update your field mapping at any time by returning to the Automate Subscriber Uploads page. Records with invalid or blank EMAIL values are automatically skipped during import.
Ongoing Sync Behavior
- Syncs run according to your selected cadence (Daily or Weekly)
- Weekly syncs process Saturday night
- You can manually trigger a sync at any time using the Import Users action
- View your full sync history — including records added, skipped, or flagged — in the View Log
Understanding SIS Sync Timing
Once an SIS automation is enabled, automated subscriber uploads are scheduled to run at 1:00 AM server time on the days configured for the integration.
The exact date of the first automated sync depends on the upload frequency selected during setup (for example, daily uploads versus weekday-only uploads). Because of this, the first scheduled sync may not occur immediately after configuration is completed.
If you would like to run the upload before the next scheduled sync, you can select Import Users within the SIS automation settings to manually initiate a sync.
If you are still configuring your integration and are not yet ready for uploads to begin, you can keep the automation's Status set to Paused until you are ready to activate it.
Additional Technical Notes
|
Rule |
Detail |
|---|---|
|
Only one file is processed |
All populations must be combined into a single CSV |
|
Each upload must overwrite the previous file |
Your IT team should configure this in their automation |
|
File must contain at least one data record |
Empty files will not be processed |
|
Weekly sync default |
Runs Saturday night; daily is also available |
Need Help?
If you have questions about formatting, field mapping, SSO matching, Community setup, or sync activation, contact the uConnect support team — we're here to help ensure a smooth and successful SIS integration.